Portable 3D Cinema
This article covers how to make your own portable 3D Cinema which uses your mobile device for playback (the screen and for audio). Now you can take your 3D Cinema with you!
You'll need a few items:
You'll also need a PC to convert your video into a suitable format.
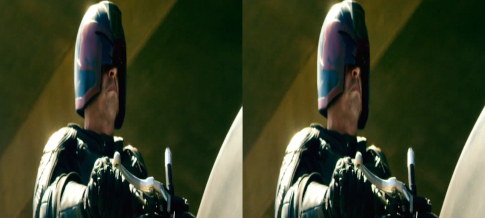
HSBS (Half Side-By-Side) 3D file
This is a 3D video file which is split to show the visual information for each eye on the left and right of the screen.
Obtaining a Side-by-side video file is not the subject of this article. One way is to rip the data from a 3D blue ray into the required format which is covered by numerous articles on the internet. If you choose to sail the high seas for a file then please buy a copy of the 3D blue ray as well as this lets the creators know we like the product and want more.
Software
You'll need to install the free ffmpeg tool on your PC (you'll be converting your video with it!) which is available for Windows, Linux and Mac OSX which you can get from here: https://ffmpeg.org/
On Linux, if you use the Aptitude package manager, at the command line type:
sudo apt update && sudo apt install ffmpeg
If you use Ubuntu, you may also like to install the extra bits and bobs for ffmpeg:
sudo apt install libavformat-extra

sudo apt install ubuntu-restricted-extras
You'll also need a video player that supports the 16:9 aspect ratio (most of them do!) which you'll need to install on your mobile device from your favourite App store (Apple Store (iPhone) or the Play Store (Android)). I like VLC media player because it plays everything and has Samba support for Windows shares. You'll likely also want it on the PC you'll be using to convert the video: https://www.videolan.org/
Again on Linux, if you use Aptitude, at the command line type:
sudo apt update && sudo apt install vlc
The Process
The magic ratio for viewing 3D content is 32:9, that's a full 16:9 frame for each eye. Most mobile device video players don't support 32:9 so first, you'll convert your HSBS video to 32:9, then you'll play it back in 16:9 ratio (which is obviously related to 32:9) on your player to preserve the 3D effect.
The headset also supports quite a large viewing area so I'll show you how to convert your video to the correct ratio and spread it over the viewing area to optimise your viewing experience. Believe me, it's worth it, I think you'll be pleasantly surprised by the results.
You might think that your mobile device resolution is a deciding factor in getting quality results but don't let that put you off, I get very good results on the cheap phone I use and it's 1600 x 720! Getting your conversion settings right is key and it will help to understand what you're doing and how to get the best results.
Considerations
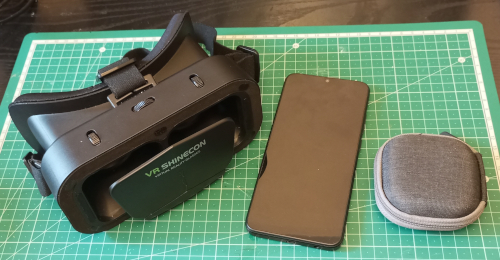
Mobile device screen size and VR headset matching...
The mobile device screen size is very important both for the VR headset you choose and your overall experience. I use a device with a 6.52″ screen, coupled with the Shinecon SC-G10 headset. Although I did use a 5.0″ screen with a Color Cross headset for an earlier set up.
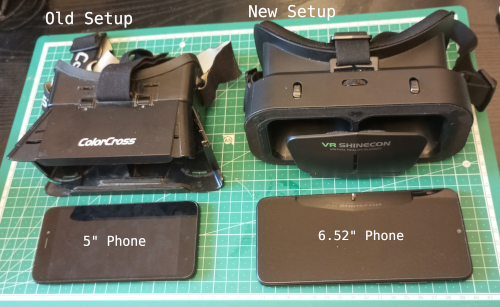
It's important that you check that your VR headset is matched to your device screen size.
HSBS File Resolution
The HSBS file resolution is important in deciding what your maximum effective file width and height can be. For example, if you had a 1080p (1920 x 1080) HSBS file then each eye is 960 pixels wide (1920 / 2) and the maximum height is decided by how much visual information you have (1080 pixels).Since each eye is a distorted 16:9 frame and it's half the width it should be, you know that in order to view it properly you just need to double the width - 1920 x 2 = 3840. So if you just scale the video and then project it onto a 4K canvas (3840 x 2160), you get a perfectly watchable 3840 x 2160 file with all the visual detail preserved but the height information only takes up half of the mobile device screen. By padding the file appropriately you can get that visual information to fill your VR headset aperture nicely and optimise the experience.
Output file size is also a factor. A 4K file will work but will be quite big (5Gb or more), which means more bandwidth, more scaling operations for your device and ultimately more battery, storage and wear and tear. Older devices might also struggle to play such files.
A smaller file optimised for your device will still put a big smile on your face whereas large files, scaled down by the device for smaller resolution screens can make the 3D experience feel slightly wonky with objects further from the movie camera often appearing a bit pixelated.
So don't worry too much about throwing away a bit of that visual information to get a better experience on a lower resolution device because your phone will be doing that anyway when it has to constantly resize each frame of video when it plays it back, you'll just be doing it in advance and it'll be a better job.
On my 1600 x 720 device for example, the video width is 1600 (so I've thrown away 320 pixels of width information) and the height is only 450 pixels (630 less pixels) but it still looks great! File sizes for that are between 1Gb and 3Gb.
The basic ffmpeg command you'll use for a 1080p HSBS input file to create a 1080p output file (should play on any modern mobile device) for the Shinecon SC-G10 headset is as follows:
ffmpeg -i "input_3D_HSBS_filename.mp4" -vf "scale=1920:540, pad=1920:864:(ow-iw)/2:(oh-ih)/2" "output_3D_HSBS_filename.mp4"
Notice that aside from the input and output file names, the command scales the video to the 32:9 ratio and then projects that onto a correctly sized canvas (adds black padding) for viewing in the VR headset. Obviously, you'll be changing the scale and pad dimensions to suit the resolution of your device accordingly.
Scale
Bearing in mind you are aimimg for a 32:9 ratio, most of the time you just need to divide the longest side of your device resolution (as you'll be playing the video in landscape) by 32 and multiply the result by 9 to establish the height.
eg. For a 1600px x 720px screen ((1600 / 32) = 50px) * 9 = 450px height
So scale=1600:450.
Pad
The VR headset (Shinecon SC-G10) shows 62.5% of my device screen (it's 3.02" x 6.52") so the padding is (video height / 62.5) * 100. eg. For a scale of 450px (on that 1600 x 720 device) - (450 / 62.5 = 7.2) * 100 = 720
Your device might be a slightly different size but this scale is suitable for most modern form factors and even if the image doesn't fit the aperture exactly, you should still get a good experience. It's about the maximum height you can give the image before it starts to look a bit odd!
So pad=1600:720.
Use your common sense. Obviously, don't scale or pad to any size that wouldn't fit the device OR that is bigger than the height resolution of your HSBS file (that's the smallest visual dimension in your HSBS video file).
Multiple Devices
If you want to view your 3D video file on multiple devices and don't want to re-encode your file for each device then here's a couple of ffmpeg settings that will do that. A 4K file (as mentioned above) will preserve all of the available visual information from a 3D 1080p HSBS file but won't play smoothly on older devices (and uses more bandwidth, storage and battery) so here are 2 settings that will render you a 1080p sized file which most modern devices will play in reasonable detail and still give you a good experience.
Pure 32:9
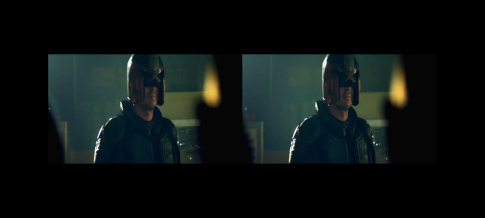
If you want your movie rendered in 32:9 (a 16:9 frame for each eye) then you can scale it to 32:9 and project it back onto a 1080p canvas. The image only takes up half the height of the device so it can be easy to miss some of the detail but everything looks as the director intended.
[ copy code ]
ffmpeg -i "input_3D_HSBS_filename.mp4" -vf "scale=1920:540, pad=1920:1080:(ow-iw)/2:(oh-ih)/2" "output_3D_HSBS_filename.mp4"
VR Headset ready
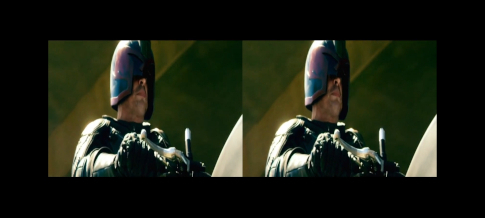
This is my preferred option. By padding the 1080p file slightly, you can get the image to fit the VR headset aperture so you can see all that lovely detail (but the image looks slightly tall!). You'll see what I mean!
[ copy code ]
ffmpeg -i "input_3D_HSBS_filename.mp4" -vf "scale=1920:540, pad=1920:864:(ow-iw)/2:(oh-ih)/2" "output_3D_HSBS_filename.mp4"
Note that in both cases above, if you have a 1080p HSBS source video file and you are creating a 1080p output file then you need to discard half of the height visual information.
Either of the above options should play on any moderm mobile device that can handle a 1080p video
file and will be correctly proportioned provided that you set the aspect ratio on the player to 16:9!
Common Resolutions
[ copy code ]
ffmpeg -i "input_3D_HSBS_filename.mp4" -vf "scale=2400:675, pad=2400:1080:(ow-iw)/2:(oh-ih)/2" "output_3D_HSBS_filename.mp4"[ copy code ]
ffmpeg -i "input_3D_HSBS_filename.mp4" -vf "scale=2532:712, pad=2532:1139:(ow-iw)/2:(oh-ih)/2" "output_3D_HSBS_filename.mp4"[ copy code ]
ffmpeg -i "input_3D_HSBS_filename.mp4" -vf "scale=915:257, pad=915:412:(ow-iw)/2:(oh-ih)/2" "output_3D_HSBS_filename.mp4"[ copy code ]
ffmpeg -i "input_3D_HSBS_filename.mp4" -vf "scale=2436:685, pad=2436:1096:(ow-iw)/2:(oh-ih)/2" "output_3D_HSBS_filename.mp4"Android
[ copy code ]
ffmpeg -i "input_3D_HSBS_filename.mp4" -vf "scale=1600:450, pad=1600:720:(ow-iw)/2:(oh-ih)/2" "output_3D_HSBS_filename.mp4"[ copy code ]
ffmpeg -i "input_3D_HSBS_filename.mp4" -vf "scale=2400:675, pad=2400:1080:(ow-iw)/2:(oh-ih)/2" "output_3D_HSBS_filename.mp4"[ copy code ]
ffmpeg -i "input_3D_HSBS_filename.mp4" -vf "scale=3200:900, pad=3200:1440:(ow-iw)/2:(oh-ih)/2" "output_3D_HSBS_filename.mp4"iPhone
[ copy code ]
ffmpeg -i "input_3D_HSBS_filename.mp4" -vf "scale=1334:375, pad=1334:600:(ow-iw)/2:(oh-ih)/2" "output_3D_HSBS_filename.mp4"[ copy code ]
ffmpeg -i "input_3D_HSBS_filename.mp4" -vf "scale=2532:712, pad=2532:1139:(ow-iw)/2:(oh-ih)/2" "output_3D_HSBS_filename.mp4"[ copy code ]
ffmpeg -i "input_3D_HSBS_filename.mp4" -vf "scale=2556:718, pad=2556:1150:(ow-iw)/2:(oh-ih)/2" "output_3D_HSBS_filename.mp4"[ copy code ]
ffmpeg -i "input_3D_HSBS_filename.mp4" -vf "scale=2778:781, pad=2778:1250:(ow-iw)/2:(oh-ih)/2" "output_3D_HSBS_filename.mp4"Results may vary
Ultimately, your overall viewing experience will be affected by the input file, quality of your hardware and how you choose to process the video. The screen may exhibit artefacts like chromatic aberration for example (which will be magnified by the lenses) and your graphics chip may not do a good job of resizing frames if it needs to. The 3D effect also varies between movies.
If you're not happy with the results, try an alternative processing option. Sometimes a pure 32:9 encoding will feel more natural than one which resizes the video to fit the viewing aperture.
Watching 3D Movies
Unlike watching in 2D where you can focus your eyes on any part of the screen, when you view a 3D movie the focal point is very much dictated by the movie (and its Director) and it can take a minute or two for your brain to adjust.
Also, the distance between your pupils (IPD) can effect your experience. If you imagine that a 3D movie is filmed by mounting two cameras side by side which is usually done at the average distance (which is 63mm apparently) then if your personal IPD is very different (it can be up to 74mm) you may find that your movie looks a bit odd though this usually only affects objects that are close to the camera and middle distance objects are usually fine (plus your brain adjusts during your viewing).
One feature they could add to these Google cardboard based headsets is the ability to tie the IPD setting (which currently centres the lens on the pupil) to the split images from the mobile device screen. It would require some kind of set up where reflections of the left and right eye image could have their separation distance adjusted by the user for comfortable viewing (similar to some VR gaming headsets).
Playing the video
You can either transfer your video file to the storage on your mobile device or play it directly over your local network straight from VLC.
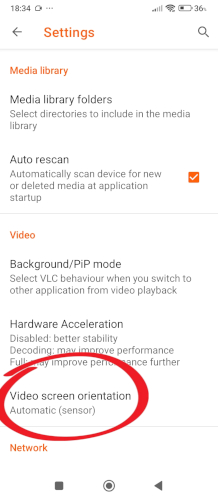
VLC Settings
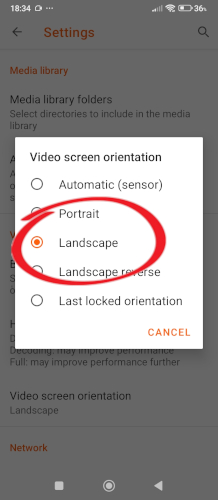
In your VLC Settings (on your mobile device), set 'Video screen orientation' to Landscape to stop the screen rotating when you move your head.
Suggestion. If you're not streaming your video from a network then switch on airplane mode to avoid interruptions.

Pop-up windows during your movie could ruin your enjoyment of it.
Remember to switch off airplane mode afterwards.
Wireless Headphones
If you've got wireless headphones then you'll need to leave bluetooth on. Just switch off your Wifi and phone data in your phone's quick settings menu instead.

Or if your device supports it, turn on airplane mode (which disables all networking) and then enable bluetooth for your wireless headphones.

- Clean the mobile device and headset lenses.
Because the lenses on the VR headset magnify the mobile device screen, you'll want to make sure you've cleaned the screen surface and headset lenses (even a small bit of fluff can be quite distracting). Use a lint free cloth (they usually come with your VR headset) and be gentle, you don't want to scratch grit against the optics.
I use a tiny bit of lens cleaner (isopropyl / rubbing alcohol), you'll want to leave it for a minute or two before wearing the headset to give time for the alcohol to evaporate or it may irritate your eyes - Attach your headphones.
If you have headphones with a volume control and pause button this will make your viewing experience better because you can pause it easily if you need to break.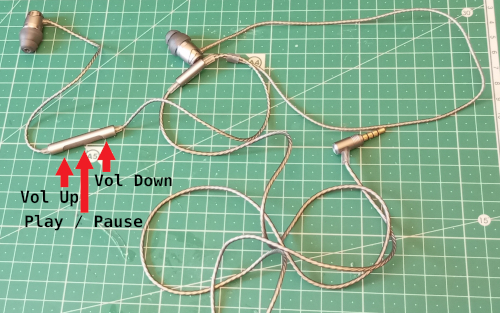
- Make sure the area around you is safe and there isn't anything close-by that you might knock over or break.
Remember you won't be able to see whilst you're enjoying the movie so it's better to be stationary and in a safe position. - Play your video.
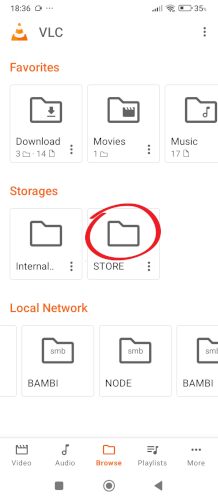
To play your video, run the VLC app, go to the 'Browse' tab and either select the Windows share that contains your video or find it in Storage or on your SD card. Select it to begin playback.
-
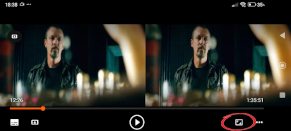
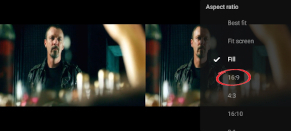
- Set the aspect ratio to 16:9.
Use the aspect ratio button to find the correct setting or hold your finger on it for a pop-up menu. THIS IS ESSENTIAL FOR THE 3D EFFECT TO WORK!
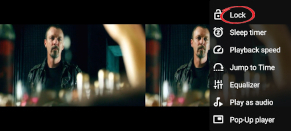
- Suggestion. Press the '...' button and select 'Lock'.
This locks the controls until you 'Slide to unlock' - just like an iPhone, so you don't accidentally press something whilst you're securing it in the headset.

- Slide your device into the VR headset.
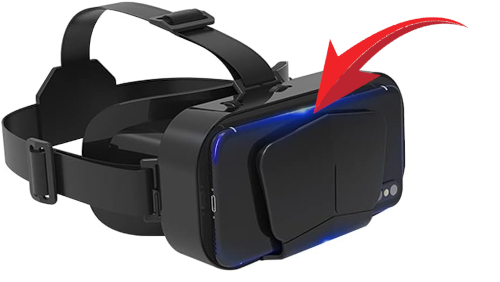
The screen obviously faces the lenses! - Put your headset on and adjust the device position.
Adjust the IPD (Inter-pupillary distance) and set the focus wheels for each eye until you see a clear picture.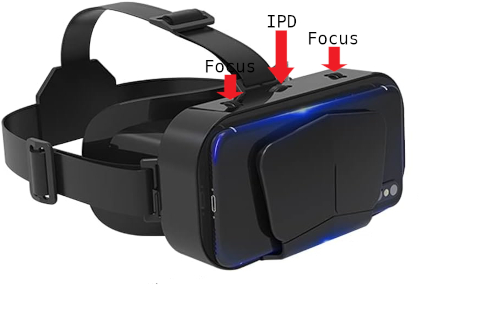
Once the headset is on, make sure the centre screen split point is hidden. Close your left eye, slide your device to the right until you can see the split then slide it left until it disappears. This is much easier when the movie frame is filled with colour than when it is black and undetectable!
Once you've created your 3D video files you can put them on an SD card and take them on holiday with you!
Here's a link to the VR headset and headphones I use, they are affiliate links and they give me commission but you know what Amazon is like, you can probably pick up a cheaper version of the same thing, I just want to make sure to recommend things I know give good results!
Google are missing a trick here!
The original idea these cheap VR headsets are based on is called 'Google Cardboard'. It was a piece of cardboard and a couple of lenses. I'm assuming they own the patent. The headset has evolved into something quite decent. The one I use has IPD adjustment and focus features and is comfortable to wear for a couple of hours. Google also own YouTube which is the perfect content delivery system for 3D movies (especially in the side-by-side format).
If I was Google, I'd get a white label version of this headset (because the quirks have been addressed), slap a Google logo on the front and offer the headset as part of YouTube premium. Give away 3 3D Movies per month as part of the premium subscription as an incentive to get the premium service (obviously with 3D Movie rental options once they chew through those). First month free. You could even bundle the headset with the Google pixel handsets.
When 3D cinema was first invented, it was expensive. VR Headsets and 3D TV's are expensive.
Now that the average westerner has a half-decent mobile device and now that the average screen resolution is on the cusp of being 4K, this makes it accessible and affordable by most people. The experience is easily comparable to my VR headset, in fact it's better in some ways because it's completely mobile.
There's also plenty of 3D content out there, they could blow this industry wide open!
Here's a list of 3D Movies to whet your appetite: